Azure Landing Zone: The 48-Hour Setup Guide (2026)
This Azure Landing Zone guide exists because most Azure environments are built wrong from day one — and the cost of that mistake compounds for years.
The default Azure onboarding experience points new users directly at resource creation. Spin up a VM. Deploy a web app. The portal makes it frictionless. What it doesn’t make visible is the governance debt accumulating underneath every click: overlapping IP address spaces that will conflict with on-premises connectivity six months from now, subscriptions with no policy boundaries that will require manual remediation at audit time, identities running on Global Administrator accounts that violate every least-privilege principle in the book.
A Landing Zone is the architectural foundation that prevents that outcome. Not a feature. Not a product. A set of design decisions — Management Group hierarchy, identity boundaries, network topology, governance policy — made before the first workload is deployed, in the correct sequence, so they don’t have to be rebuilt later.
This Azure Landing Zone guide covers that foundation: what it is, why the sequencing matters, and how to build it correctly in 48 hours.
What An Azure Landing Zone Actually Is
Microsoft’s Cloud Adoption Framework defines an Azure Landing Zone as a pre-configured, governed environment designed to host workloads at scale. This Azure Landing Zone guide applies that framework to a concrete 48-hour build sequence. The marketing definition undersells what it actually does architecturally.
A Landing Zone is the answer to a specific class of failure: the enterprise that migrates 200 workloads to Azure, discovers 18 months later that their subscription structure can’t support policy enforcement at scale, their network topology can’t integrate with on-premises without re-addressing, and their identity model has drifted so far from least-privilege that a security audit requires a remediation programme rather than a configuration change.
The Landing Zone prevents that outcome by establishing five architectural constraints before workloads are deployed:
Organizational structure — Management Groups define the hierarchy through which policy, access, and governance inherit downward. The structure chosen at the start determines what’s enforceable at scale.
Identity boundaries — who can do what, at which scope, under which conditions. The identity model is the primary security control in Azure. It is also the most commonly misconfigured.
Network topology — the Hub-and-Spoke model centralizes connectivity, firewall, and VPN in a shared services layer that all application VNets peer to. This keeps the security perimeter consistent and manageable.
Governance policy — Azure Policy enforces configuration standards continuously. Policies applied at the Management Group level inherit to every subscription beneath — preventative governance rather than reactive remediation.
Cost visibility — tagging policies, budget alerts, and cost management configuration applied before workloads are deployed produce accurate cost data from day one rather than requiring retroactive cleanup.
For a detailed comparison of how the Azure Landing Zone architecture differs from AWS Control Tower’s approach to multi-account governance, the AWS Control Tower vs Azure Landing Zone analysis covers both models in depth.
Day 1 – The Foundation Layer
Management Groups: The Governance Skeleton
Management Groups are the organizational hierarchy above subscriptions. Policy assignments, role assignments, and cost management configurations applied at a Management Group scope inherit to every subscription beneath it. The structure you build here determines what you can enforce across the entire estate without per-subscription configuration.
The CAF reference hierarchy provides a proven starting point:
Tenant Root Group
├── Platform (shared services)
│   ├── Identity
│   ├── Connectivity
│   └── Management
└── Landing Zones (application workloads)
    ├── Corp (internal, connected workloads)
    └── Online (internet-facing workloads)
Why this structure matters: The Corp/Online split is not cosmetic. These two Management Groups carry fundamentally different policy requirements. Corp workloads need private connectivity, stricter egress controls, and tighter compliance baselines. Online workloads need internet-facing network policies and different threat protection configurations. Separating them at the Management Group level means those policy differences are enforced automatically as new subscriptions are placed under the correct group — rather than configured manually on each deployment.
The mistake to avoid: A flat hierarchy — all subscriptions under a single Management Group — feels simpler at the start and becomes operationally painful at scale. Retrofitting a Management Group hierarchy into an estate with deployed workloads requires moving subscriptions, which disrupts policy inheritance and often breaks role assignments.
In the portal: Navigate to Management Groups → Start using management groups → Create the Platform and Landing Zones groups under your Tenant Root. Move your current subscription under Platform.
Identity & Access: IAM Before Infrastructure
The Global Administrator role in Entra ID has unrestricted access across the entire tenant. It is an emergency access role — appropriate for initial tenant setup and break-glass scenarios. It is not an operational identity for daily infrastructure management.
Before deploying any infrastructure, establish the correct identity model:
Step 1 — Create administrative security groups Create a security group: Azure-Platform-Admins. This group will hold the identities responsible for platform-level infrastructure. Do not use the Global Admin account for resource deployment.
Step 2 — Create operational user accounts Create a dedicated user account separate from your Global Admin account. Add it to Azure-Platform-Admins. Use this account for all infrastructure operations.
Step 3 — Assign permissions at the correct scope Assign the Owner role to Azure-Platform-Admins at the Platform Management Group scope — not at the subscription level, not at the tenant level. Scope determines blast radius.
Step 4 — Enforce MFA Navigate to Entra ID → Properties → Manage Security Defaults and confirm MFA is enabled. On any production tenant, this is not optional. A compromised identity without MFA is a compromised subscription.
The principle: IAM in Azure is the primary security perimeter. A correctly scoped identity model limits the blast radius of a compromised credential to the scope it was assigned — not the entire tenant. Every role assignment made at too-broad a scope is a risk that compounds as the estate grows.
Day 2: Network Topology & Governance
Hub-and-Spoke: The Network Foundation
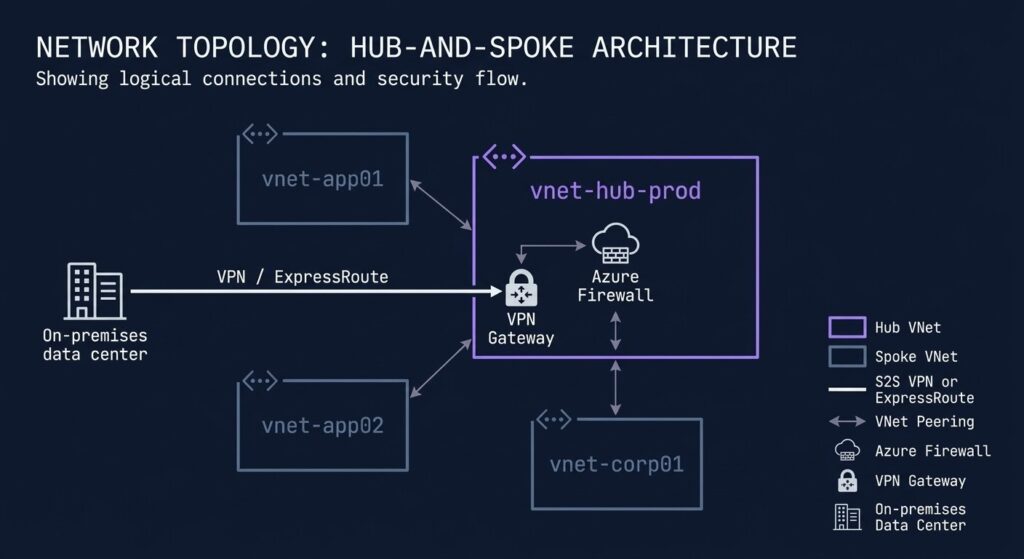
The Hub-and-Spoke network model separates shared connectivity infrastructure — firewall, VPN gateway, DNS — from application workloads. The Hub VNet hosts the shared services. Application workloads deploy into Spoke VNets that peer to the Hub, routing their traffic through the centralized firewall.
Why this model: A flat network model — all workloads in a single VNet or unconnected VNets — either creates an unmanageable security surface (flat single VNet) or an unmanageable connectivity mesh (full peering between all VNets). Hub-and-Spoke scales cleanly: adding a new application environment means creating a new Spoke VNet and a single peering connection to the Hub.
Building the Hub VNet:
Create Resource Group: rg-hub-prod-eastus
Create VNet: vnet-hub-prod-eastus
- Address space:
10.100.0.0/16 - Subnets:
GatewaySubnet(10.100.0.0/27),AzureFirewallSubnet(10.100.1.0/26)
The GatewaySubnet name is not a convention — it is required by Azure for VPN and ExpressRoute gateways. The AzureFirewallSubnet name is similarly required. These cannot be renamed.
Building the Spoke VNet:
Create Resource Group: rg-app01-prod-eastus
Create VNet: vnet-app01-prod-eastus
- Address space:
10.10.0.0/16 - Subnets:
snet-app01-prod(10.10.1.0/24),snet-data01-prod(10.10.2.0/24)
Address space planning is a one-time decision. The CIDR block assigned to a VNet cannot be changed after creation without re-deployment. Before assigning address spaces, map all existing on-premises subnets and any other cloud environments. Overlap between the Hub VNet, Spoke VNets, and on-premises ranges produces routing failures that are painful to remediate in a running environment.
VNet Peering:
Navigate to vnet-hub-prod-eastus → Peerings → Add. Connect to vnet-app01-prod-eastus. Enable Allow forwarded traffic if VPN connectivity to on-premises is planned — this allows traffic from on-premises to route through the Hub to the Spoke.
Governance & Policy
Azure Policy evaluates resources continuously against defined rules and either prevents non-compliant deployments (Deny effect) or flags them for remediation (Audit effect). Policies assigned at the Management Group scope apply to every subscription beneath it — no per-subscription configuration required.
Three policies to deploy at the Landing Zones Management Group from day one:
Require tags on resource groups — enforces cost allocation metadata at creation time rather than retroactively. CostCenter, Environment, and Owner are the minimum useful tag set for a production estate.
Allowed locations — restricts resource deployment to approved Azure regions. For data sovereignty requirements, this is the enforcement mechanism that keeps data residency provable.
Require MFA for management plane access — enforces the identity requirement at the policy layer in addition to the Entra ID configuration, providing defence-in-depth.
Policies applied after workloads are deployed require remediation tasks to bring existing resources into compliance. Policies applied before first deployment require no remediation — every resource created after the policy assignment is evaluated at creation time.
Cost Reality
This Azure Landing Zone guide would be incomplete without the honest cost numbers. The Hub-and-Spoke architecture with full production-grade shared services carries real monthly costs — and those costs run whether or not workloads are actively using the infrastructure.
| Component | Monthly Cost (approx.) | Notes |
|---|---|---|
| Azure Firewall Standard | ~$900/month | Fixed deployment cost regardless of traffic volume. Runs 24/7. |
| Azure Firewall Basic | ~$290/month | Lab and dev environments. Missing threat intelligence and IDPS features required for production. |
| VPN Gateway (VpnGw1) | ~$140/month | Fixed gateway cost. Data transfer charged separately per GB. |
| VNet Peering | $0.01/GB each direction | Intra-region peering. Cross-region peering carries higher per-GB rates. |
For lab and validation environments: Deploy Azure Firewall Basic instead of Standard, and delete the Resource Groups (rg-hub-prod-eastus, rg-app01-prod-eastus) when the lab session is complete. The Management Group hierarchy and policy assignments survive resource group deletion — the network layer is the cost driver, not the governance layer.
For production environments: The ~$1,040/month baseline for Firewall Standard + VPN Gateway is the infrastructure tax for a correctly governed Azure estate. Size it against the cost of the alternative — an ungoverned environment that requires a remediation programme 18 months later.
The 48-Hour Sequencing
Order of operations matters. Each layer depends on the one before it.
The reason sequence matters: a workload deployed before the Management Group hierarchy exists is outside the policy inheritance model. A VNet created before address space planning is done may require re-addressing to connect to on-premises. An identity model configured after resource deployment requires retroactive permission cleanup. The 48-hour sequence is not arbitrary — each step creates a dependency that the next step relies on.
Architect’s Verdict
Most Azure environments that require remediation programs at 18 months were not built with bad technology — they were built without an Azure Landing Zone guide to sequence the foundation correctly. They were built in the wrong order.
The Landing Zone is not the interesting part of Azure. The interesting part is the workloads — the applications, the data pipelines, the AI services. The Landing Zone is the foundation that makes those workloads governable, auditable, and recoverable at scale.
Build the governance layer before the workload layer. The 48 hours spent on Management Groups, identity, and network topology is not overhead — it is the decision that determines whether the environment is manageable at 50 workloads or requires a rebuild at 20.
For architects comparing the Azure Landing Zone approach against AWS Control Tower for multi-cloud environments, the AWS Control Tower vs Azure Landing Zone deep-dive covers the architectural differences and the downstream operational implications of each model.
For the broader Azure infrastructure architecture — identity governance, hybrid connectivity, and Zero Trust enforcement — the Microsoft Azure Infrastructure pillar page covers the full stack.
Additional Resources
Editorial Integrity & Security Protocol
This technical deep-dive adheres to the Rack2Cloud Deterministic Integrity Standard. All benchmarks and security audits are derived from zero-trust validation protocols within our isolated lab environments. No vendor influence.
R.M.
Senior Solutions Architect with 25+ years of experience in HCI, cloud strategy, and data resilience. As the lead behind Rack2Cloud, I focus on lab-verified guidance for complex enterprise transitions. View Credentials →
Get the Playbooks Vendors Won’t Publish
Field-tested blueprints for migration, HCI, sovereign infrastructure, and AI architecture. Real failure-mode analysis. No marketing filler. Delivered weekly.
Select your infrastructure paths. Receive field-tested blueprints direct to your inbox.
- > Virtualization & Migration Physics
- > Cloud Strategy & Egress Math
- > Data Protection & RTO Reality
- > AI Infrastructure & GPU Fabric
Zero spam. Includes The Dispatch weekly drop.
Need Architectural Guidance?
Unbiased infrastructure audit for your migration, cloud strategy, or HCI transition.
>_ Request Triage Session