The Controller Tax: Modeling Hyperconverged Resource Contention
Nobody tells you about the controller tax before the migration.
The Nutanix sales deck shows you the performance numbers. The proof-of-concept runs clean. The migration estimate is scoped to VMs and storage, not infrastructure overhead. You sign off on the hardware, schedule the cutover windows, and start moving workloads.
Then you get to production density — and the numbers don’t add up.
You sized your AHV cluster for the same VM count you were running on vSphere. Same vCPU allocation. Same memory reservation. Except now every host is running hotter than expected, a handful of VMs are showing latency spikes that weren’t there before, and Prism is showing CVM CPU utilisation you didn’t account for in the capacity model.
That’s the controller tax. Every AHV node runs a Controller VM — a privileged guest that handles all storage I/O for that node before a single VM sees a byte. The CVM is not optional. It is not lightweight. And if it wasn’t in your capacity model, you’ve been running your cluster in deficit since day one without knowing it.
This post is about fixing that — before you migrate, not after. If you’re already in production and recognising these symptoms, the diagnostic signals in the second half will tell you exactly what to look for. If you haven’t read the series Primer yet, that’s the licensing risk context that frames why this migration is happening at all.
What the CVM Actually Costs You
The Controller VM is the architectural component that makes Nutanix DSF work. It manages all local storage I/O, coordinates writes across the cluster for replication, handles the data locality routing that keeps read I/O off the network, and manages Stargate (the storage I/O engine), Curator (the distributed metadata manager), and Cassandra (the metadata store). All of that runs on your host’s physical CPU and memory — competing directly with your guest VMs.
Nutanix publishes minimum CVM sizing requirements. In practice, the minimum is not the right model for production environments.
The default CVM allocation varies by AOS version and hardware profile, but a typical configuration reserves:
- 8–12 vCPUs depending on node type and workload profile
- 32–64GB RAM depending on storage capacity and I/O intensity
- Additional CPU headroom for Stargate spikes during write-heavy periods
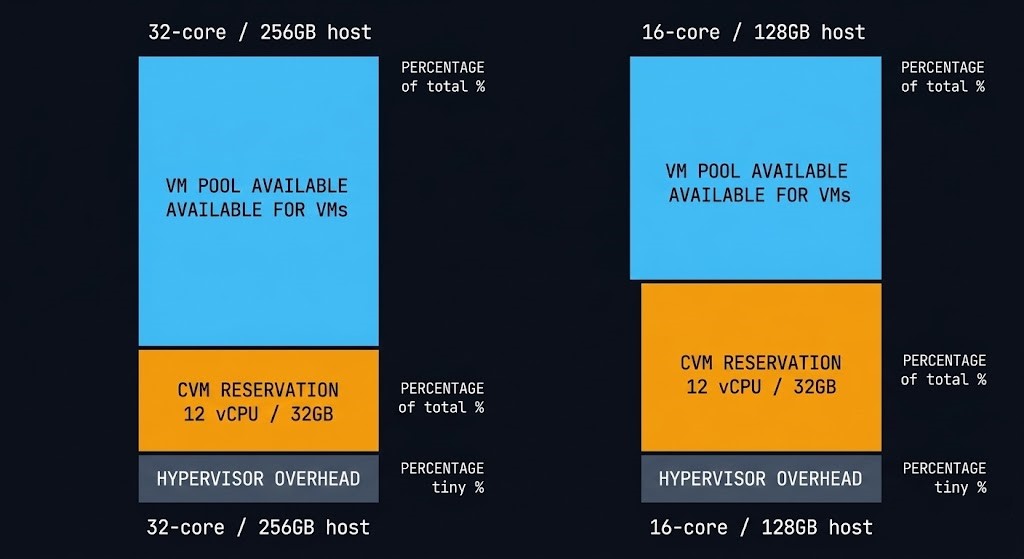
On a 32-core host, a 12 vCPU CVM consumes over one third of the compute capacity that would otherwise be available for guest workloads. On a smaller 4-node cluster with lower core counts — common in mid-market Broadcom exit deployments — the CVM tax as a percentage of available host capacity is significantly higher.
The memory side is less variable but equally important. The CVM’s memory reservation is hard — it cannot be ballooned or reclaimed by the hypervisor under pressure. Whatever you’ve allocated to the CVM is gone from the VM pool permanently. On a 256GB host with a 32GB CVM reservation, your effective VM memory pool is 224GB before the hypervisor’s own overhead is subtracted.
Modeling the Tax Before You Migrate
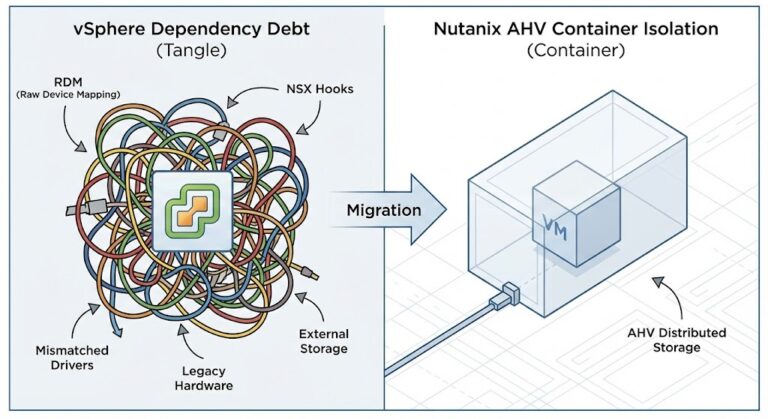
The mistake most architects make is scoping AHV cluster capacity the same way they scoped vSphere cluster capacity — total host resources divided by average VM size, with a headroom buffer. That model doesn’t account for the CVM as a fixed overhead per node. The Virtualization Architecture pillar covers the full platform comparison context if you’re still evaluating whether AHV is the right destination before running this model.
The correct model works like this:
Step 1 — Establish effective host capacity
For each AHV node, subtract the CVM reservation and hypervisor overhead from raw host resources before calculating VM density.
| Resource | Raw Host | CVM Reservation | Hypervisor Overhead | Effective VM Pool |
|---|---|---|---|---|
| CPU (cores) | 32 | 12 vCPU | ~2 | 18 cores |
| Memory | 256GB | 32GB | ~8GB | 216GB |
This is your actual starting point for VM placement — not the number on the hardware spec sheet.
Step 2 — Apply your workload profile
Not all CVMs are sized equally. Nutanix recommends larger CVM allocations for:
- High-density all-flash nodes with NVMe — Stargate drives harder under low-latency NVMe I/O
- Nodes running Nutanix Files or Objects — additional CVM processes consume more CPU
- Clusters with high concurrent snapshot activity — Curator and Cassandra overhead increases significantly during snapshot-heavy periods
If your workload profile includes any of these, the published minimum CVM sizing is the floor — not the recommendation.
Step 3 — Model N+1 under CVM load
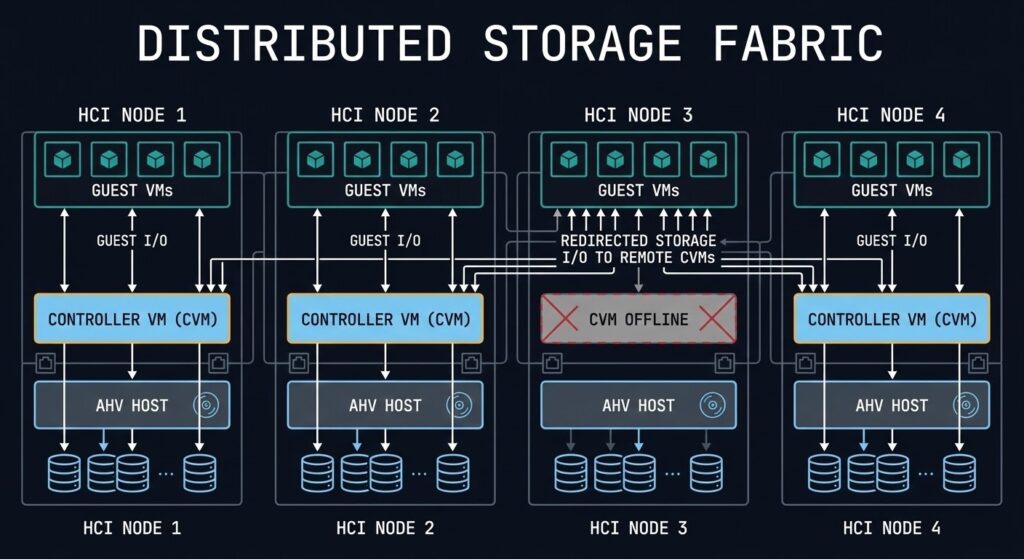
The most overlooked part of AHV capacity planning is what happens when a CVM fails or is taken offline for maintenance. When a CVM is unavailable, its host’s VMs continue to run — but their storage I/O is redirected to CVMs on other nodes. Every surviving node absorbs a portion of the failed node’s I/O load on top of its own workload.
Model your cluster at N+1 (one node offline) under peak I/O load. If the remaining nodes’ CVMs are already running at 60–70% CPU utilisation under normal conditions, a CVM failure pushes them into saturation territory. That’s when you start seeing latency spikes across VMs that have nothing to do with the failed node.
The rule of thumb: no CVM should sustain above 50% CPU utilisation under normal operating conditions. That buffer is what absorbs N+1 load without degrading guest performance.
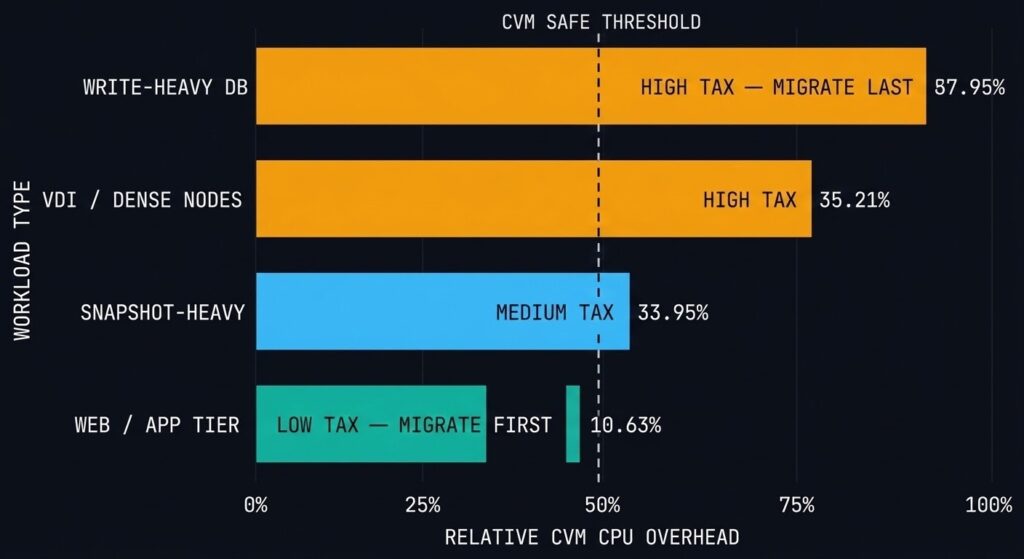
The Workloads That Pay the Highest Tax
Not every workload type hits the controller tax equally. Understanding which workloads drive the highest CVM overhead helps you sequence your migration waves correctly — move the low-tax workloads first while you validate the cluster’s behaviour under load, then move the high-tax workloads once you’ve confirmed headroom.
High CVM tax workloads:
Write-heavy transactional databases — every write goes through Stargate for RF2/RF3 replication. Under sustained high-write load, Stargate CPU consumption spikes significantly beyond baseline. SQL Server OLTP workloads, Oracle RAC, and high-frequency message queue systems all fall into this category. These workloads require CVM CPU headroom beyond the standard sizing recommendation.
VM-dense nodes — the CVM serves all VMs on its host. The more VMs running concurrent I/O on a single node, the higher the aggregate demand on the CVM’s Stargate process. VDI deployments and dense application tier clusters are the most common source of CVM CPU saturation in production AHV environments.
Snapshot-heavy environments — Nutanix snapshots are space-efficient but not free. The Curator process, which manages snapshot metadata and garbage collection, runs on the CVM. Environments with deep snapshot trees — backup-heavy workloads, environments running frequent crash-consistent snapshots for compliance — drive elevated Curator CPU consumption that persists between I/O peaks.
Nutanix Files and Objects on the same cluster — as covered in the Nutanix AHV Architecture guide, running Files FSVMs or an Objects store on the same cluster as production VMs adds CVM process overhead that doesn’t appear in a standard VM-only capacity model.
Lower CVM tax workloads — migrate these first:
Web tier and application servers with predominantly read I/O, development and test environments with intermittent I/O, and stateless compute workloads where the VM writes infrequently and reads from a network-attached source rather than local AHV storage.
Part 1 of this series covered the execution physics differences between ESXi and AHV that govern how these workloads behave post-migration. The controller tax model here is the capacity layer on top of that physics foundation. The full sequencing — from platform decision through migration execution — is mapped in the Migration Strategy Learning Path.
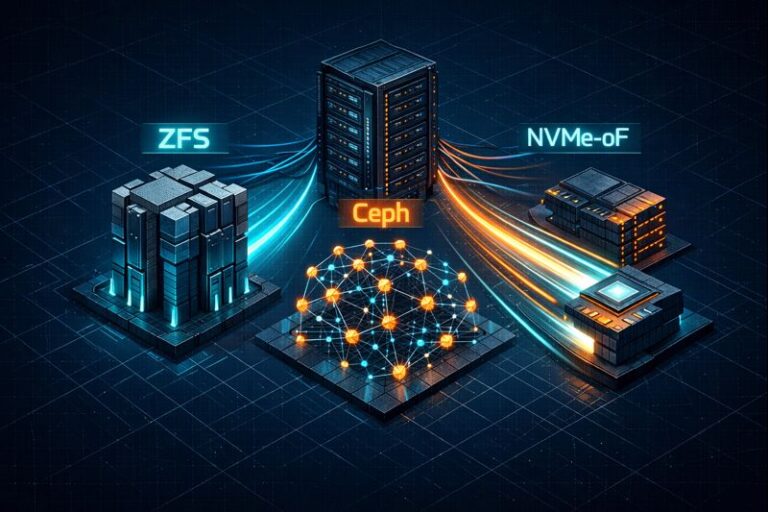
The Controller Tax vs vSAN vs Ceph: Is This Worse Than VMware?
Every architect evaluating AHV asks some version of this question. The honest answer is that it depends on what you’re comparing — because the overhead model is architecturally different across all three platforms, not just different in magnitude.
| Platform | Controller Architecture | Overhead Model |
|---|---|---|
| Nutanix AHV | CVM per node — privileged guest VM | Fixed CPU and memory reservation, always on |
| VMware vSAN | Kernel module inside ESXi | Minimal dedicated CPU — shares kernel scheduler with VM workloads |
| Ceph (Proxmox / oVirt) | OSD daemon per disk | CPU overhead distributed per physical disk, scales with drive count |
Nutanix — predictable tax, fixed cost. The CVM reservation is explicit and non-negotiable. You know exactly what you’re giving up before the first VM boots. The tradeoff is that the reservation is always there whether you’re at 10% utilisation or 100%. No surprises, but no elasticity.
vSAN — kernel overhead, harder to see. vSAN doesn’t reserve a fixed vCPU pool the way the CVM does. Its storage stack runs as a kernel module inside the ESXi vmkernel, competing with VM workloads through the same CPU scheduler. Under normal load the overhead is minimal. Under sustained high-write load — particularly with deduplication and compression enabled — the kernel threads driving storage operations consume CPU that shows up as scheduler pressure across all VMs on that host, not as an obviously attributed storage process. The tax is real but less visible in the capacity model.
Ceph — distributed overhead, scales with disk count. Each OSD daemon managing a physical disk runs as a Linux process consuming CPU on the host. The per-OSD overhead is low in isolation — typically 1–2 cores per OSD under normal load — but on a dense storage node with 24+ drives, aggregate OSD daemon CPU consumption is significant. Unlike the CVM, Ceph OSD overhead scales with the number of drives, not the number of VMs. Write-heavy workloads that trigger replication across multiple OSDs drive additional CPU consumption at the OSD level.
The architectural conclusion: Nutanix pays the controller tax up front, explicitly, in the capacity model. Ceph distributes it across disks — the more storage density you deploy, the more OSD overhead you carry. vSAN hides it in the kernel scheduler where it’s harder to attribute and plan for, but lighter under typical workloads. None of these is free — the difference is where the cost appears and how predictable it is.
For architects already running AHV in production, the controller tax manifests as a specific pattern of symptoms that are easy to misattribute to guest-level problems. Here’s what to look for in Prism and how to read the signals correctly.
CVM CPU Utilisation — the primary indicator
Prism Central surfaces per-CVM CPU utilisation at the host level. The threshold to watch: sustained CVM CPU above 70% under normal operating conditions (not during LCM upgrade cycles, which are expected to spike). Sustained elevation above 70% means you have insufficient CVM headroom for workload variance. Above 85% sustained is a sizing problem that needs remediation before the next peak period.
The nuance: CVM CPU utilisation that spikes during backup windows and returns to baseline afterwards is expected behaviour. CVM CPU that is consistently elevated throughout the business day — not just during backup or snapshot operations — indicates either under-sizing or a workload profile that wasn’t modelled correctly pre-migration.
Remote I/O Percentage — the N+1 early warning
Every AHV node reports the percentage of its storage I/O that is being serviced by a remote CVM rather than the local one. Under normal conditions, remote I/O should be near zero — data locality is the whole point of DSF. Elevated remote I/O on a specific node indicates one of three things: the local CVM is degraded or under pressure and deflecting requests, there’s a VM placement imbalance driving I/O to a node that doesn’t hold the primary data copy, or a CVM failure is actively redirecting traffic.
Persistent elevated remote I/O without a corresponding CVM failure alert is the hardest pattern to catch — the cluster is compensating silently while adding latency to every I/O request on that node. The AHV vs vSAN 8 I/O Benchmark documents what this latency impact looks like under sustained load.
Memory Balloon Activity on the CVM itself
This is a critical warning that the CVM is being memory-starved by the host. Under normal conditions, the CVM’s memory reservation is hard and protected — the hypervisor should not be ballooning the CVM. If you see balloon driver activity on the CVM process, your host is under memory pressure severe enough that the hypervisor is attempting to reclaim reserved CVM memory. This is an emergency signal, not a warning. Any I/O being processed by that CVM at the moment of ballooning is at risk.
Stargate-specific CPU spikes without corresponding VM I/O peaks
Stargate CPU spikes that don’t correlate with guest VM I/O activity indicate background Curator or Cassandra operations — snapshot garbage collection, replication catch-up after a network partition, or disk rebalancing after a node was returned to the cluster. These are normal but timing-sensitive. Scheduling backup windows, snapshot operations, and LCM cycles to avoid overlap with peak VM I/O periods reduces the likelihood of CVM saturation from background work competing with foreground I/O.
For the operational monitoring framework — including the specific Prism and Grafana dashboard configuration that surfaces these signals — the Resource Pooling Physics post covers the broader CPU wait and memory ballooning diagnostic model that applies across both vSphere and AHV environments.
Remediation: What to Do When the Tax Is Too High
If your post-migration analysis reveals CVM sizing problems — or if you’re pre-migration and your capacity model shows insufficient headroom — these are the remediation options in order of increasing disruption:
1. Increase CVM vCPU and memory allocation The least disruptive fix if the host has available physical capacity. CVM resizing requires a rolling CVM restart — one node at a time — which is non-disruptive to VMs if done correctly. This is the first option if the host has headroom but the CVM was sized to the minimum.
2. Rebalance VM placement across nodes If specific nodes are consistently hot while others are underutilised, VM placement imbalance is the likely cause. AHV’s Acropolis Dynamic Scheduler (ADS) handles automated placement, but manual intervention via Prism is sometimes required to rebalance I/O-heavy VMs across nodes. Moving a single write-heavy database VM off a saturated node can resolve CVM contention faster than any sizing change.
3. Add nodes to the cluster If the cluster is uniformly hot — all CVMs elevated, not just one or two nodes — the cluster is undersized for the workload. Adding nodes distributes both the VM load and the CVM I/O load. This is the right answer when the problem is aggregate cluster capacity rather than per-node imbalance.
4. Separate high-tax workloads onto dedicated nodes For environments with a small number of extremely I/O-intensive workloads — large transactional databases, high-throughput analytics clusters — dedicated AHV nodes for those specific workloads prevents CVM saturation from spilling over into the general VM pool. This is a more advanced architecture decision that most environments don’t need, but for mixed-workload clusters with a few outlier I/O consumers it is the cleanest solution.
The Pre-Migration Checklist
Before moving a single production workload to AHV, validate these five things:
1. CVM sizing against your actual workload profile — not the minimum, not the default. The HCI Migration Advisor runs automated readiness checks against your vSphere environment — detecting ISOs, snapshots, and hardware compatibility — and surfaces your workload I/O profile against the CVM sizing recommendation for your specific hardware before you commit to node count.
2. CVM NUMA alignment — large CVM allocations can cross NUMA boundaries on multi-socket hosts, introducing remote memory access latency that degrades both CVM and guest VM performance. Validate your NUMA topology, confirm the CVM vCPU count fits within a single NUMA domain, and verify memory locality before deployment. This is especially critical on AMD EPYC hosts where NUMA domains are smaller and the penalty for crossing them is measurable.
3. Storage network validation — CVM performance is network-dependent. Every write is replicated across nodes before acknowledgement. Validate 25GbE minimum for NVMe-based nodes (10GbE is insufficient for NVMe I/O throughput at scale), jumbo frames enabled end-to-end, and ToR switch buffer depth adequate for the burst profile of your write-heavy workloads. A storage network bottleneck looks exactly like CVM CPU saturation in the metrics — validate the network before blaming the CVM.
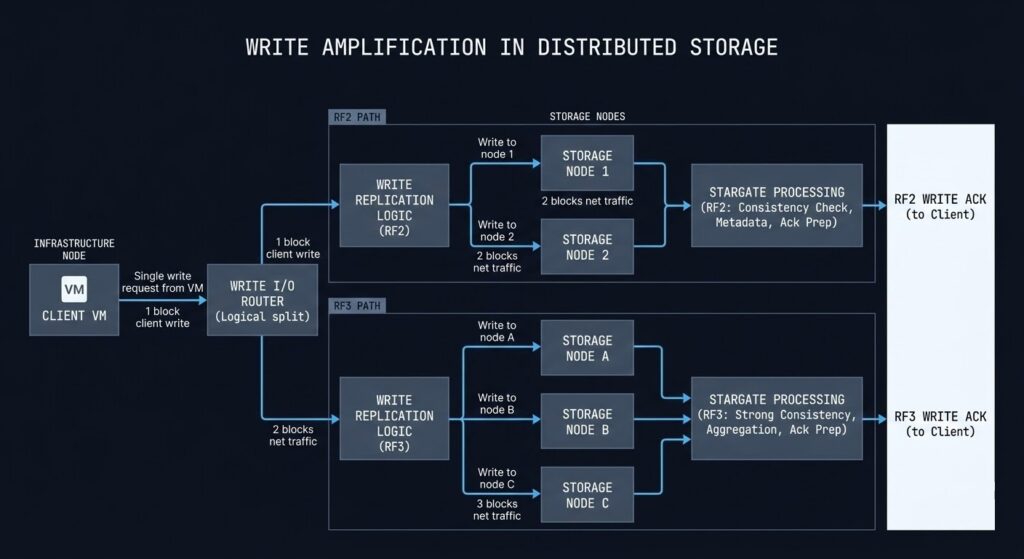
4. RF policy impact on Stargate load — replication factor directly multiplies write amplification through Stargate. RF2 doubles every write. RF3 triples it. If your workload is write-heavy and you’re defaulting to RF3 for all VMs, your Stargate CPU baseline is 50% higher than an equivalent RF2 deployment. Model your RF policy against your write I/O profile before migration, not after.
| RF Policy | Write Amplification |
|---|---|
| RF2 | 2× |
| RF3 | 3× |
5. Snapshot policy review — deep snapshot trees drive sustained Curator and Cassandra overhead on the CVM that compounds over time. Before migration, audit your existing snapshot depth, backup schedule frequency, and retention policies. Migrating a VM with a 30-day snapshot chain into AHV doesn’t just move the VM — it moves the Curator load that chain generates. Validate snapshot depth per VM class before the migration wave that includes backup-heavy workloads.
6. Cluster rebuild time estimation — if a node fails, the surviving CVMs must rebuild the failed node’s data share across the remaining nodes. That rebuild process is a sustained CVM I/O and CPU load spike that runs in parallel with normal VM workloads. Estimate your rebuild time before migration:
cluster_rebuild_time ≈ dataset_size / replication_network_bandwidthFor a 20TB dataset on a 25GbE storage network running at 50% utilization during rebuild, that’s a multi-hour elevated load event. Know the number before you need it. The full sizing model that unifies controller tax, rebuild amplification, N+1 headroom, and upgrade window buffer into a single cluster envelope is the subject of the HCI Failure-State Architecture specialization track.
7. Effective VM pool after CVM and hypervisor reservation — recalculate your VM density model using effective capacity, not raw host specs. The table in the modeling section above is the starting point.
8. N+1 CVM headroom — model your cluster with one node’s CVM offline. If surviving CVMs exceed 50% CPU at peak under that scenario, add a node before migration.
9. Monitoring baseline established before cutover — Prism Central alerts configured for CVM CPU threshold, remote I/O percentage, and CVM memory before the first production VM moves. Establish the baseline during low-stakes migration waves so anomalies stand out clearly during the high-stakes ones.
What’s Next in the Series
Part 3 — Migration Stutter: Handling High-I/O Cutovers Without Data Loss — covers the cutover window architecture for the workloads that pay the highest controller tax. Specifically: how to sequence the Move tool cutover for write-heavy VMs, how to model the delta-sync window under sustained write load, and the pre-cutover validation steps that prevent the most common causes of data inconsistency during migration.
If you’re sizing your cluster before migration, run the HCI Migration Advisor now. The controller tax model is built in.
You know the risk of carrying forward architectural debt. Now, we tear down the mechanics. Track the series below as we map the exact physical changes required for a deterministic migration.
Skip the wait. Download the complete Deterministic Migration Playbook (including the Nutanix Metro Cluster Implementation Checklist) and get actionable engineering guides delivered via The Dispatch.
SEND THE BLUEPRINTARCHITECTURAL REFERENCE & ADDITIONAL READING
Editorial Integrity & Security Protocol
This technical deep-dive adheres to the Rack2Cloud Deterministic Integrity Standard. All benchmarks and security audits are derived from zero-trust validation protocols within our isolated lab environments. No vendor influence.
R.M.
Senior Solutions Architect with 25+ years of experience in HCI, cloud strategy, and data resilience. As the lead behind Rack2Cloud, I focus on lab-verified guidance for complex enterprise transitions. View Credentials →
Get the Playbooks Vendors Won’t Publish
Field-tested blueprints for migration, HCI, sovereign infrastructure, and AI architecture. Real failure-mode analysis. No marketing filler. Delivered weekly.
Select your infrastructure paths. Receive field-tested blueprints direct to your inbox.
- > Virtualization & Migration Physics
- > Cloud Strategy & Egress Math
- > Data Protection & RTO Reality
- > AI Infrastructure & GPU Fabric
Zero spam. Includes The Dispatch weekly drop.
Need Architectural Guidance?
Unbiased infrastructure audit for your migration, cloud strategy, or HCI transition.
>_ Request Triage Session